Revitalize Your Garden: The Essential Guide to Dividing Daffodil Bulbs for More Blooms
Daffodils are the undisputed heralds of spring, gracing our gardens with their cheerful trumpets and vibrant hues. But what happens when your once-bountiful clumps of daffodils start producing fewer, smaller flowers, or look overly crowded? The answer often lies in understanding how daffodils propagate and the art of dividing their bulbs. This essential gardening technique not only breathes new life into tired plantings but also allows you to effortlessly multiply your favorite varieties, ensuring an even more spectacular display next season.
While daffodils do have natural propagation methods, human intervention through division is key to maintaining vigorous growth and maximizing bloom production. It's also an incredible way to share your garden's beauty with friends or expand your daffodil drifts into new areas. Let's explore the various ways these beloved bulbs multiply and dive deep into the most effective method for increasing your daffodil yield.
Understanding Daffodil Propagation: Nature's Way vs. Gardener's Art
To truly appreciate the power of bulb division, it helps to know the different ways how daffodils propagate, both naturally and with a little help from us gardeners. Each method has its own pace and purpose.
Slow and Steady: Propagation by Seed
One way daffodils propagate is through seeds, found within small pods that form after the flowers fade. While fascinating to observe, this is generally considered the "hard way" for home gardeners looking to increase their daffodil display. Growing daffodils from seed is an incredibly slow process; it can take anywhere from three to seven years for a seedling to mature enough to produce its first flower. Furthermore, daffodil seeds rarely produce plants identical to their parent, as they are often hybridized. If you're hoping to replicate a specific treasured variety, like the unique 80-year-old 'Snow Gem' daffodil at Culpepper Garden mentioned in our references, seed propagation simply isn't the reliable path. For a deeper dive into why dividing bulbs triumphs over the lengthy process of seed propagation, you might find our article Unlock More Daffodils: Dividing Bulbs vs. Slow Seed Propagation particularly insightful.
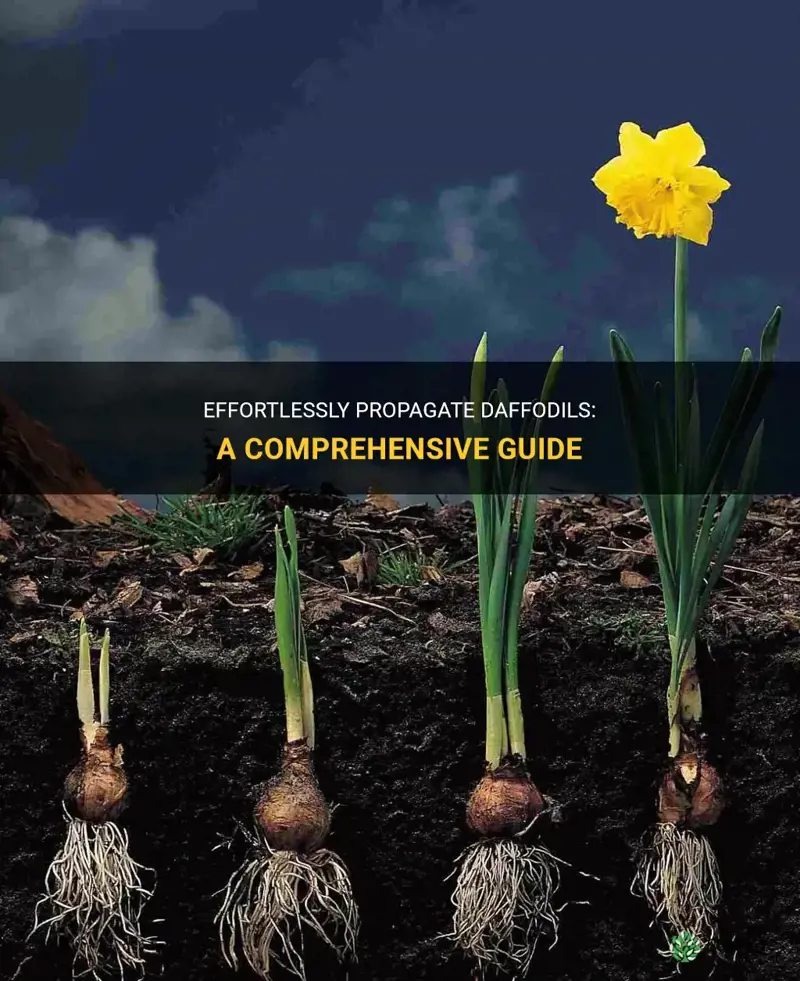
Nature's Offsets: Natural Bulb Splitting
Daffodil bulbs naturally produce smaller bulbs, known as offsets or bulbils, from their base over time. These offsets remain attached to the mother bulb, eventually developing into flowering-sized bulbs themselves. This is a form of natural propagation that contributes to the beautiful, dense clumps we often see. However, left unchecked, this natural splitting can lead to overcrowding. When bulbs become too densely packed, they compete intensely for nutrients, water, and sunlight, resulting in diminished vigor, smaller flowers, and fewer blooms overall. This is where the gardener's art of division becomes crucial.
The Gardener's Advantage: Basal Plate Bulb Division
For gardeners eager to rapidly increase their daffodil collection and ensure robust, healthy blooms, manual bulb division – particularly focusing on the basal plate – is by far the most effective method. This technique allows you to take a single healthy bulb and transform it into multiple viable planting pieces, each capable of forming a new plant. It's a faster, more controlled, and highly rewarding approach compared to waiting for natural offsets or the years required for seed propagation. For those ready to accelerate their daffodil propagation efforts, our dedicated guide, Propagate Daffodils Fast: The Basal Plate Bulb Division Method, offers comprehensive instructions.
When is the Best Time to Divide Daffodil Bulbs?
Timing is everything when it comes to dividing daffodils. The ideal window for this task occurs after the flowers have faded but before the foliage completely dies back and disappears. This is typically late spring to early summer, usually around late May to early July, depending on your climate and the daffodil variety.
- Why not earlier? Allowing the foliage to yellow and senesce naturally is critical. During this period, the leaves are still photosynthesizing, converting sunlight into energy that is then stored in the bulb for next year's blooms. Cutting the foliage too early deprives the bulb of vital stored energy, weakening it and potentially leading to fewer or no flowers the following spring.
- Why not later? While you technically *can* dig up dormant bulbs in late summer or early fall, doing so becomes more challenging. The yellowing foliage acts as a clear marker, making it easy to locate your bulbs in the garden bed. Once the leaves are gone, finding the bulbs without accidentally damaging them is much harder. Dividing when the leaves are still somewhat visible also allows the new divisions more time to establish roots before winter sets in.
Look for signs that your daffodil clumps are ready for division: reduced flowering, smaller blooms, or a general lack of vigor in a previously healthy patch. These are all indicators of overcrowding.
Step-by-Step Guide to Dividing Daffodil Bulbs
Now that you understand the "why" and "when," let's walk through the practical steps of dividing daffodil bulbs, ensuring you maximize your chances of success.
1. Gather Your Tools and Prepare
Before you begin, ensure you have the right equipment:
- Garden fork or spade: For digging up the bulbs.
- Sharp, clean knife or pruners: Sterilize with rubbing alcohol to prevent disease transmission.
- Gloves: Daffodil sap can irritate skin.
- Bucket or tray: For collecting bulbs.
- Labels: Essential if you're dividing different varieties.
- Well-draining soil amendment: Such as compost or grit, for replanting.
2. Carefully Dig Up the Clump
Using your garden fork or spade, carefully dig around the perimeter of the daffodil clump. Start a good 6-8 inches away from where the foliage emerges to avoid damaging the bulbs. Gently loosen the soil, then pry the entire clump out of the ground. Try to keep as much of the root ball intact as possible initially.
3. Clean and Separate the Bulbs
Once the clump is out, gently shake off excess soil. You'll likely see individual bulbs that have naturally separated or are loosely attached. For these, simply pull them apart. For more stubborn clumps, gently tease them apart. Remove any damaged, diseased, or excessively small bulbs. Discard any bulbs that feel soft, mushy, or show signs of fungal growth.
4. The Basal Plate Division Technique (for multiplying a single bulb)
If you wish to multiply a single, healthy bulb into several pieces, the basal plate division is the way to go. This method requires precision but yields excellent results:
- Prepare the Bulb: Choose a large, healthy daffodil bulb. Gently snip off any remaining dry foliage near the top. Carefully peel back some of the papery outer layers, similar to peeling garlic, to better expose the structure of the bulb.
- Locate the Basal Plate: Turn the bulb upside down. The basal plate is the flat, often darker disc at the very bottom of the bulb from which the roots emerge. This is the crucial part, as it's where new roots and shoots will form.
- Make the Cuts: Using your sharp, sterilized knife, make clean, vertical cuts through the bulb, from the top down through the basal plate. The goal is to ensure each resulting section has a significant portion of the basal plate attached. While you *could* divide a bulb into many small pieces, cutting it into quarters or halves ensures a hardier, more successful division. The interior of the bulb, including visible scales (which become leaves) and even tiny embryonic blossoms, will be split.
- Cure the Divisions (Optional but Recommended): After dividing, it's beneficial to allow the cut surfaces to dry and "cure" for a day or two in a cool, shaded, well-ventilated area. This forms a protective callus, reducing the risk of rot when replanted.
5. Replanting Your Divisions
Once divided, your bulbs are ready for replanting. Choose a site with well-draining soil and plenty of sunlight (at least 6 hours per day). Plant daffodils at a depth roughly three times the height of the bulb. For instance, a 2-inch tall bulb should be planted about 6 inches deep. Space smaller divisions about 4-6 inches apart, and larger bulbs 6-8 inches apart. Incorporate compost or other organic matter into the planting hole to improve soil structure and fertility. Water thoroughly after planting to settle the soil.
Remember the golden rule: allow the foliage to fully yellow and die back naturally in subsequent years. This ensures the bulbs store maximum energy for the spectacular display you're working so hard to achieve.
Benefits Beyond More Blooms
Dividing daffodils offers several advantages beyond simply increasing your plant count:
- Healthier Plants: By alleviating overcrowding, bulbs have better access to nutrients, water, and air circulation, leading to more vigorous growth and larger, healthier flowers.
- Disease Prevention: Dense clumps can create humid conditions that are ripe for fungal diseases. Division improves airflow, reducing disease risk.
- Maintaining Vigor: Regular division (every 3-5 years, or when blooms diminish) revitalizes aging clumps and ensures consistent, strong flowering for years to come.
- Preserving Varieties: For unique or heirloom daffodils, like the 'Snow Gem' mentioned, division is a crucial method to ensure the genetic identical twin of the plant lives on, unlike seed propagation which can result in variations.
Conclusion
Dividing daffodil bulbs is a fundamental practice for any gardener wishing to cultivate a thriving, vibrant spring display. It's a testament to the gardener's active role in nurturing their plants, transforming a seemingly simple bulb into a source of continuous beauty. By understanding how daffodils propagate and embracing the methodical process of division, you can not only solve common problems like overcrowding but also embark on a rewarding journey of expanding your garden's charm, one cheerful daffodil bloom at a time. So, grab your spade, mark your calendar, and get ready to multiply your daffodil joy!